- Summertime is Summer Tire Check Time: 7 Tips To Combat 11,000+ Tire-Related Accidents Annually — and Keep Tires Rolling for Longer
- 10 DIY Tips to Add Years to a Vehicle’s Life & Minimize Expensive Repairs
- Defensive Driving Tips to Avoid Costly Repairs As Wintery Driving Conditions Continue to Plague Roads
- AutoPartsWarehouse.com 2013 Child Passenger Safety Tips and Resource Guide
- Top Five Parts to Make Your Vehicle More Fuel Efficient
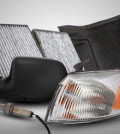
Review: Spyder Lighting Upgrade
Overview
Project: Spyder Lighting Upgrade
Vehicle: 2006 Dodge Magnum SXT
Level of Difficulty: Moderate (some electrical splicing and special tools required)

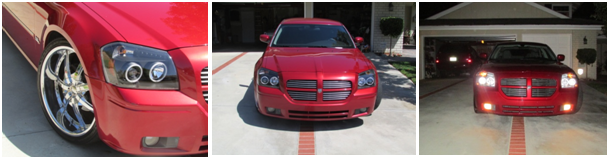
I consider myself a car enthusiast and take pride in my cars, including my 2006 Dodge Magnum SXT. My well-maintained wagon regularly receives compliments. However, some people ask about my cloudy headlights. I have tried several different products and resorted to professional help to resurface and/or polish my headlights without success.
Installation
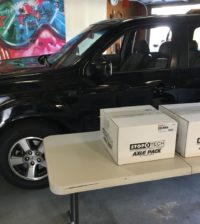
After doing some research on Auto Parts Warehouse, I found that Spyder Auto headlights had the look I wanted. Since I was upgrading the front of my wagon with LED lights, I decided to buy a matching set of taillights. I received the parts three business days later and immediately went to work on the installation. I decided to tackle the rear lights first because I felt they would be the easier of the two to install, and I was right.
The removal of the stock rear lights was very easy. It involved two panel plugs just inside the rear hatch and one threaded connection that is hidden behind a panel inside the car. The panel plugs should be removed using a special tool, but I was able to use a flat head screwdriver along with a pair of needle-nose pliers to safely remove them.
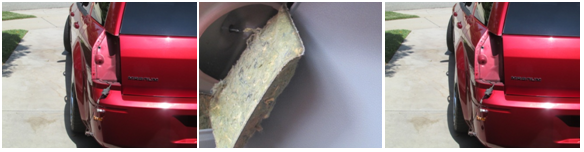
Once the stock lights were removed, I followed the directions provided for connecting the new Spyder tail lights. The backup and turn signal bulbs fit right into the new light assembly with no changes as indicated. The LED connection for the light only involved removing the existing bulb and connecting the harness provided—very easy. The entire process took less than five minutes for each side and I feel confident that the average car owner would not have a problem with the install of these lights. The only recommendation I have is to pay special attention to the removal of the wing nut inside the rear panel. This is a very tight space and if you drop the nut while inside, good luck finding it!
Now it is time for the headlights. The removal of stock headlights and install of the Spyder headlights was a much different experience than the tail lights. I started by removing the new headlights from the package and taking a look at what was included. One thing that was noticeably missing was a wiring diagram or instructions for the Inverter and LED/Halo lights.
I decided to just start on the removal of the stock headlights and once they were off I would be able to figure out the wiring. The removal of the headlight assemblies was a lot more involved than the rear. After looking for easy access points around the headlights for a few minutes,I knew I would need to do some research. I went to the Spyder website and was unable to find any instructions or diagrams so I went to YouTube. I first looked up how to remove headlights for my year and model and found several great step by step videos.
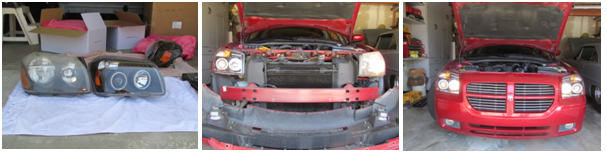
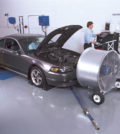
To remove the headlights you must first remove the entire front bumper cover and grill assembly. This involves 6 8mm screws under the front apron, one 10mm screw and two panel plugs on each side, and finally six panel plugs on top of the grill. Once these have been removed, you can pull the front section off and carefully place on a soft surface in front of the car. This will expose two screws on each headlight: one below and one on the top inside corner. These screws require a Torx Screwdriver to remove—if you don’t own a set, you will need to purchase or borrow from a friend.

The pictures above show the before and then completely dismantled front end of my car. Once the front end was apart I was able to easily figure out the headlight and high beam connection. I removed the bulbs from the existing wiring and plugged that connector directly into the new headlight assembly. The parking light and turn signal bulbs are used from the stock light assembly and plug directly into the new ones. At this point all I needed to do was connect the LED and a Halo wiring with the inverter, but had no idea where to begin. So once again I went back to YouTube and searched for Spyder CCFL Halo LED Projector Headlight install and found lots of help. I was able to watch several videos that showed how and where to connect the wiring for my vehicle.
To start you need to find the parking light wiring which will be the larger of the two amber bulbs going to your assembly. Then you will need to peel back the black sheathing around the wires and find the white/purple wire (hot) along with the black wire (ground). This is where you will connect the wires from the LED/HALO so that they light up with your parking lights and also when headlights are on. First you need to connect the inverter provided with the connectors coming from the Halo light; they have black connectors that need to be plugged in to each other.
Next you need to take the red wire from the inverter along with the white wire from the LED lights and join those two with a connector not provided and then tie in those to the white/purple wire from the parking light assembly. The black wires from the inverter and from the LED then need to be connected and the tied into the black wire from the existing parking light wiring. This process involves the cutting and splicing of wires as well as connectors that are not provided; and if you have never worked with automotive electrical, this can be a bit overwhelming. Once those connections were made, it was time to test—success on the first try!
The second headlight went in much faster; and once they were both wired and installed I was very happy with the end result. The total time spent on the front lights was right around 2 hours including the needed break to go online and research the dismantling of the front end as well as the second video I found on how to wire the LED, inverter and Halo lights. The extra time and labor involved in the front end was well worth the end result
The bottom line
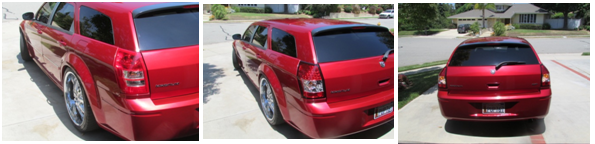
The Spyder CCFL halo LED projector headlights and tail lights made a substantial improvement to the overall look of my car. After only having the Spyder lights on for one day I have already received several compliments. I think the lights helped me update and enhance the custom look I wanted for my wagon.
Related Posts

-
 Kendall Motor Oil Knowledge Session-Things to know about Full Synthetic Motor Oil Additives
By AutoPartsWarehouse Staff, images courtesy of Kendall Motor Oil...
- November 10, 2017
-
 Kendall Motor Oil Knowledge Session-Things to know about Full Synthetic Motor Oil
By AutoPartsWarehouse Staff, images courtesy of Kendall Motor Oil...
- November 10, 2017
-
 Autolite Iridium XP Spark Plug Install
by Steve and Gavin Maloof The guys at AutoPartsWarehouse...
- August 2, 2017
-
 Car Care 101: Common Reasons Why Your Brakes Squeak
Does it bother you when you hear unusual noises...
- June 28, 2017
-
 Car Care Checklist for Summer: Part II
Here are more things to consider to get your...
- June 24, 2017
-
 Top Five Auto Parts the Average Consumer Should Purchase Online — and Here’s Why!
AutoPartsWarehouse.com says the Internet is the best place for...
- January 21, 2013
-
 Summertime is Summer Tire Check Time: 7 Tips To Combat 11,000+ Tire-Related Accidents Annually — and Keep Tires Rolling for Longer
U.S. drivers put almost 3 billion miles on their...
- June 4, 2014
-
 AutoPartsWarehouse.com 2013 Child Passenger Safety Tips and Resource Guide
A Wake Up Call On Child Passenger Safety The...
- September 12, 2013
-
 6 Amazing Classic Car Restorations
Restoring old cars always come with a hefty price...
- November 24, 2014
-