- Summertime is Summer Tire Check Time: 7 Tips To Combat 11,000+ Tire-Related Accidents Annually — and Keep Tires Rolling for Longer
- 10 DIY Tips to Add Years to a Vehicle’s Life & Minimize Expensive Repairs
- Defensive Driving Tips to Avoid Costly Repairs As Wintery Driving Conditions Continue to Plague Roads
- AutoPartsWarehouse.com 2013 Child Passenger Safety Tips and Resource Guide
- Top Five Parts to Make Your Vehicle More Fuel Efficient
Review: 4WDPros 10,000lb Winch
Product: 4WDPros 10,000lb Winch Install
Vehicle: 1999 Jeep Wrangler Sahara
Level of Difficulty: Easy
Overview
We have wanted a Jeep (CJ or Wrangler) for years. Recently a 1999 Jeep Wrangler Sahara in good condition crossed our path, so we pulled the trigger and bought it. Our goal was to turn the Jeep into a reliable trail rig, so we began planning what changes to make. One item was a winch. In our search we found the 4WDPros 10,000 pound winch on AutoPartsWarehouse.com. The price was excellent compared to other winches on the market, and combined with the features and 10,000 pound rating this winch was too much for us to resist.
First Impressions
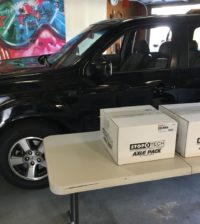
The winch was packaged well, and arrived without damage. The heavy styrofoam was compartmentalized to keep individual components from getting knocked around.

Unboxing the 4WDPros 10000lb Winch
The finish on the winch was excellent, and everything appeared to be high quality. Included with the winch were a very nice roller fairlead, wired and wireless remotes, mounting hardware for the winch and fairlead, and a nice pair of leather gloves (the reason for this will be explained later).

What’s included in the box
Installation
Tools Used:
- Safety glasses – always a good idea, but necessary when installing C-Clip during roller installation in fairlead
- Gloves (provided with winch) – for handling winch cable
- 12mm open end wrench – electrical connections to winch motor
- 16mm socket or wrench – fasteners for mounting winch and fairlead to winch plate
- 17mm open end wrench – nuts to mount fairlead to winch plate
- Wrench to fit battery terminals will vary by vehicle – for attaching electrical cables to battery
- Snap Ring Pliers – for removal of roller in fairlead
- Pliers – for hook cotter pin installation
- Small flat head screwdriver – for guiding insulating caps over electrical connections and helping re-seat snap ring during roller installation
- #2 Phillips screwdriver – electrical control box installation onto winch
- Zip ties – securing electrical wiring
- Light oil – lubricating winch cable
- Thread locking compound (optional) – winch and fairlead mounting hardware
Winch Installation
The instructions that come with the winch cover multiple models so they lack some specific details, but are easy to understand. The only notable items missing were instructions for mounting the electrical control box to the winch.
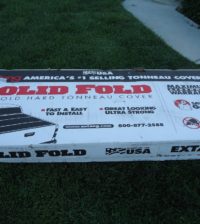
Before installation, we had to select a way to mount the winch to our Jeep. We chose a winch plate from Smittybilt (also purchased from AutoPartsWarehouse.com). Our winch plate was the Low Style, which necessitated drilling some additional holes thru the bumper to mount the winch and winch plate. Smittybilt’s High Style would probably have allowed mounting without drilling additional holes. The mounting bolt pattern for the winch is industry standard 10 x 4.5 inches.

The winch plate
Once the winch plate was installed, we bolted the winch to it with most of the supplied hardware. Our specific application required 1⁄4 inch longer fasteners for the front mounting holes, as we had to account for the additional thickness of the bumper (the holes we had to drill earlier). The instructions don’t mention that the square nuts that come on the fasteners slide into slots on the underside of the winch (we assumed the bottom of the winch housing was threaded). Split Lock Washers are included in the hardware, but we chose not to use them, using a thread locking compound instead. With the winch was installed, we did a final torque on the hardware and moved on to mounting the roller fairlead.

Bolting the winch into the winch plate
Before installation of the roller fairlead, we gathered the necessary hardware (included with the winch) and appropriate tools. We fed the looped cable end between the rollers and noticed an issue: the cable crimp creating the loop in the cable was too large to pass between the rollers in the fairlead. Getting around this required disassembly and partial removal of one of the horizontal rollers. This wasn’t difficult, but did require a pair of C-Clip Pliers to remove one of the C-Clips from the end of the roller axle. NOTE: the C-Clips holding the roller axle in are somewhat soft, and spreading the C-Clip too far will distort it. Additionally, there is a spring washer under one of the C-Clips on each roller. This makes re-installing the C-Clip difficult and could result in the C-Clip and/or spring reaching near light speed across your garage (wear eye protection).

Installing the roller fairlead
With the fairlead installed it was time to install the hook onto the cable. The operator’s manual doesn’t mention installing the hook, but it is straightforward. Simply remove the cotter pin from the pin in the hook, slip the hook over the loop in the cable, re-install the hook pin, and put the cotter pin thru the hole in the hook pin. A word of advice: when installing the cotter pin, bend the ends all the way around the hook pin so the sharp ends don’t surprise you later.
Wiring
In all honesty, this is the part we were dreading. Luckily, this turned out to be the easiest part of the install. The operator’s manual explains the wiring very well. We began by mounting the control box to the top of the winch. The control box has two mounting tabs on the bottom. One end of each is hooked to go around one of the spacer rods connecting each end of the winch, and the other end of each has a screw to secure to another spacer rod.
We mounted our control box with the wires facing rearward towards the grill of the Jeep. We made sure that all of the wires coming out of the control box went between the control box and the spacer rods (if they go under the spacer rod, they might get caught in the cable, which would be bad). One of the small wires coming out of the control box is blue and about 3 inches long. This isn’t mentioned in the manual, but we assume it is the antenna for the wireless winch control.
The only awkward step in wiring the winch was the installation of the black ground cable and small black wire coming from the control box. The mounting bolt to connect these is directly under the winch motor, which is about 3/4 inch above the winch mount plate. Getting the fastener started isn’t impossible, but the small space and stiff ground cable make it difficult.

Wiring the winch
Once wiring on the winch was complete, we routed the power and ground cables thru the grill and started snaking them toward the battery. Make sure not to connect the cables to the battery until all other connections have been made. Cables were secured using zip ties, taking care to avoid sharp edges that could cut the cable insulation. When we reached the battery, we fastened the cable ends to the battery posts and we were done!

Winch installation complete
Pre-use
Finally, time to play. The operator’s manual states that the spooled cable needs to be unwound and re-spooled under tension (500 pounds or greater), and also lubricated. We began by putting the winch gearbox in freewheel mode, and unspooled the cable until we saw the red marking on the cable as described in the manual.

Red marking on the cable
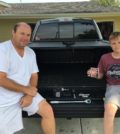
We then attached the cable hook to the tow hook of a 3⁄4 ton pickup we had lying around.

Testing the tow hook
We hooked up the winch controller, engaged the winch clutch (not always as easy as it seems, we had to rotate the spool a bit to get the clutch to engage), and pulled cable in until the winch cable was tight. At this point we lubricated the winch cable with light oil.

Lubricating with light oil
Now remember those gloves we talked about earlier? This is where the gloves come in. If you are going to handle the cable at all, wear gloves. This lesson was learned the hard way. Not sliding your hand or fingers along the winch cable is another valuable lesson. Guess how we learned that one.
With the cable properly lubed, it was time to spool it onto the drum. With the Jeep in neutral and the engine running, one person applied the vehicle brakes and operated the winch while the other (wearing gloves this time – always wear the gloves!) guided the cable onto the winch spool, making sure the cable spooled smoothly and evenly.

4WDPros 10000lb winch at work
A few times we had to unspool the cable a bit due to one wrap not laying next to the previous. We found that the driver had to steer to keep the line pointed directly in front of the Jeep. This helped immensely in spooling the cable smoothly. We also checked the winch motor temperature occasionally just to be safe. The motor barely got warm during the 86 ft pull. Line speed was measured on the second wrap of cable at approximately 14 feet per minute.
The bottom line
We haven’t had the chance to use this winch off-road yet, but so far we are impressed. Components appear to be high quality, fit and finish are excellent, and it looks great!
Related Posts


-
 Kendall Motor Oil Knowledge Session-Things to know about Full Synthetic Motor Oil Additives
By AutoPartsWarehouse Staff, images courtesy of Kendall Motor Oil...
- November 10, 2017
-
 Kendall Motor Oil Knowledge Session-Things to know about Full Synthetic Motor Oil
By AutoPartsWarehouse Staff, images courtesy of Kendall Motor Oil...
- November 10, 2017
-
 Autolite Iridium XP Spark Plug Install
by Steve and Gavin Maloof The guys at AutoPartsWarehouse...
- August 2, 2017
-
 Car Care 101: Common Reasons Why Your Brakes Squeak
Does it bother you when you hear unusual noises...
- June 28, 2017
-
 Car Care Checklist for Summer: Part II
Here are more things to consider to get your...
- June 24, 2017
-
 Top Five Auto Parts the Average Consumer Should Purchase Online — and Here’s Why!
AutoPartsWarehouse.com says the Internet is the best place for...
- January 21, 2013
-
 Summertime is Summer Tire Check Time: 7 Tips To Combat 11,000+ Tire-Related Accidents Annually — and Keep Tires Rolling for Longer
U.S. drivers put almost 3 billion miles on their...
- June 4, 2014
-
 AutoPartsWarehouse.com 2013 Child Passenger Safety Tips and Resource Guide
A Wake Up Call On Child Passenger Safety The...
- September 12, 2013
-
 6 Amazing Classic Car Restorations
Restoring old cars always come with a hefty price...
- November 24, 2014
-